- How should I/O be integrated into systems?
- What are the general mechanisms?
- How can we make them efficient?
36.1 시스템 구조
일반적인 시스템의 고전적 구조
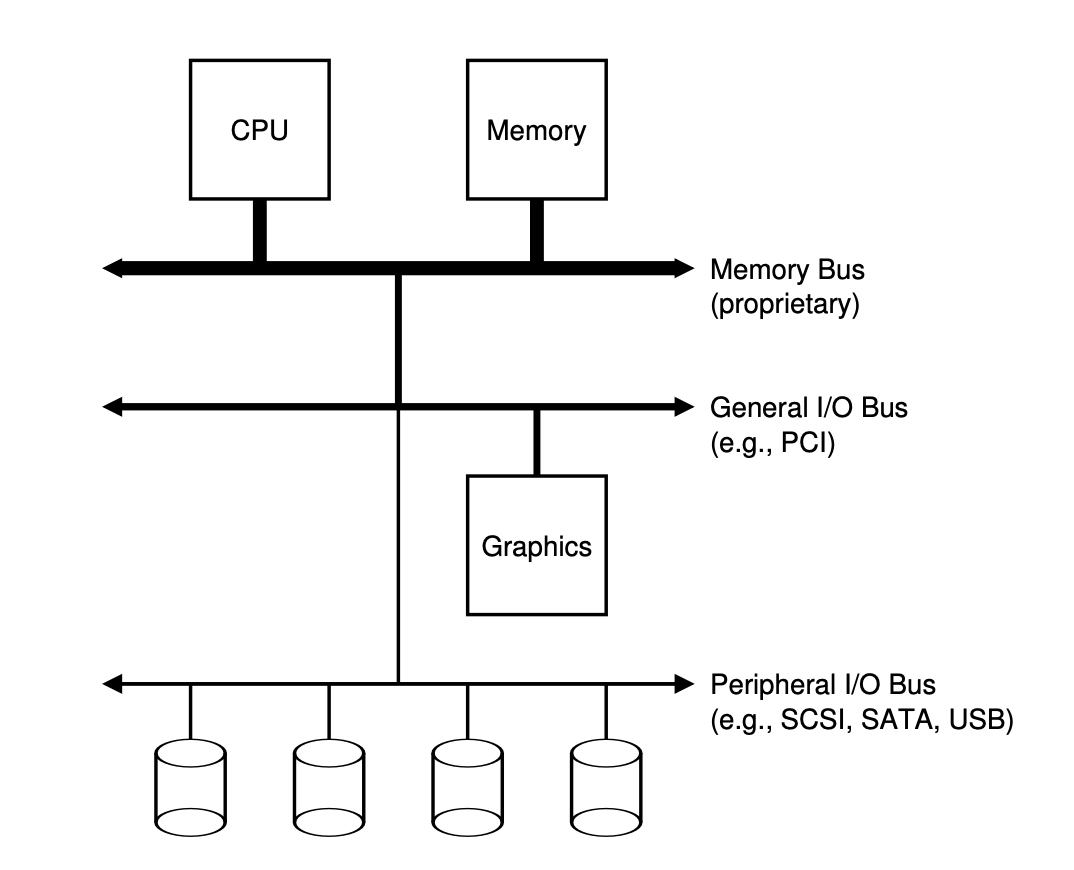
- CPU와 주메모리가 메모리 버스로 연결되어 있다.
- 몇 가지 장치들이 범용 I/O 버스에 연결이 되어 있는데, 많은 현대의 시스템에서는 PCI를 사용하고 있다.
-
아래에는 주변장치용 버스가 있다(SCSI, SATA, USB).
- 계층 구조가 필요한 이유: 물리적인 이유와 비용
- 버스가 고속화되려면 더 짧아져야 하는데, 그런 고속 메모리 버스에는 여러 장치들을 수용할 공간이 없다.
-
고속의 성능을 내는 버스를 만드는 기술은 비싸다.
- 고성능 장치들을 CPU에 가깝게 배치, 느린 성능의 장치들은 멀리 배치
- 디스크처럼 느린 장치를 주변 장치 I/O 버스에 연결하여 얻는 이득: 많은 장치들을 연결할 수 있다.
현대식 시스템 구조
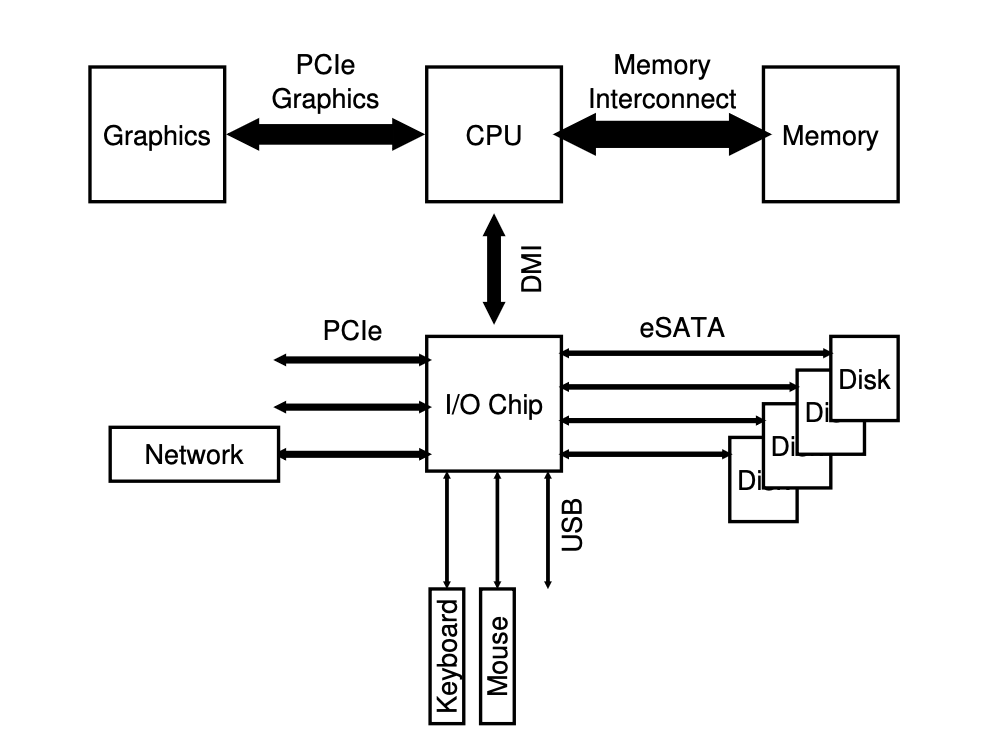
- CPU는 인텔의 DMI(Direct Media Interface) 기술을 통해 I/O 칩에 연결되어 있다.
-
나머지 장치들이 이 칩에 여러 다른 종류의 연결 방식을 사용하여 연결된다.
- 하나 또는 그 이상의 하드 디스크들이 eSATA(external SATA) 방식으로 시스템에 연결되어 있다.
- I/O 칩 아래 쪽으로는 여러 개의 USB(Universal Serial Bus) 인터페이스가 있다.
- 느린 성능의 장치들을 연결하기 위해 USB가 사용된다.
- 시스템에 또 다른 고성능의 장치들을 연결할 수 있도록 PCIe가 있다.
- PCIe: Peripheral Component Interconnect Express
- 고속의 저장 장치(NVMe 등)이 주로 여기에 연결이 된다.
36.2 표준 장치
- 두 개의 중요한 요소: 하드웨어 인터페이스와 내부 구조
하드웨어 인터페이스
- 인터페이스를 제공하여 시스템 소프트웨어가 동작을 제어할 수 있도록 해야 한다.
- 모든 하드웨어 장치들은 특정한 상호 동작을 위한 방식과 명시적인 인터페이스를 갖고 있다.
내부 구조
36.3 표준 방식
-
인터페이스: 세 개의 레지스터로 구성되어 있다.
- 상태 레지스터: 장치의 현재 상태를 읽을 수 있다.
- 명령어 레지스터: 장치가 특정 동작을 수행하도록 요청할 때 사용한다.
- 데이터 레지스터: 장치에 데이터를 보내거나 받거나 할 때 사용한다.
장치가 운영체제를 대신하여 특정 동작을 할 때에 운영체제와 장치 간에 일어날 수 있는 상호 동작의 과정
While (STATUS == BUSY)
    ; // 장치가 바쁜 상태가 아닐 때까지 대기

데이터를 DATA 레지스터에 쓰기
명령어를 COMMAND 레지스터에 쓰기
    (그러면 장치가 명령어를 실행한다)

While (STATUS == BUSY)
    ; // 요청을 처리하여 완료할 때까지 대기
-
먼저 반복적으로 장치의 상태 레지스터를 읽어서 명령어 수신 가능 여부를 확인한다.
- 이 동작을 장치에 대해 폴링(polling)한다고 표현한다.
- 기본적으로 어떤 작업을 하고 있는지 묻는 것과 같다.
-
운영체제가 데이터 레지스터에 어떤 데이터를 전달한다.
- 데이터 전송에 메인 CPU가 관여하는 경우를 programmed I/O라고 부른다.
-
운영체제가 명령 레지스터에 명령어를 기록한다.
- 명령 레지스터에 명령어가 기록되면 데이터는 이미 준비되었다고 판단하고 명령어를 처리한다.
-
마지막으로 운영체제는 디바이스가 처리를 완료했는지를 확인하는 폴링 반복문을 돌면서 기다린다.
- 성공과 실패를 알리는 에러 코드를 받게 된다.
이 방식은 매우 비효율적이다(매우 비효율적인 폴링을 사용한다). 다른 프로세스에게 CPU를 양도하지 않고, 장치의 동작이 완료되기 전까지 계속 루프를 돌면서 장치상태를 체크한다(= 폴링). 입출력 장치는 매우 느리며, CPU는 시간을 많이 소모하게 된다.
핵심 질문: 폴링 사용 비용을 어떻게 피하는가
어떻게 하면 자주 폴링을 하지 않으면서 운영체제가 장치의 상태를 확인할 수 있고, 장치를 관리하는 CPU의 오버헤드를 줄일 수 있을까?